Sunday, April 26, 2009

Steps in making rock trough from styrofoam fish box


Today I made my first "rock" trough out of a styrofoam fish box.  Here are the items you will need to create your own:
Styrofoam fish box (Mine was from a pet store, but you can also get them from fish market)
Wire Brush (bought mine at Big Lots $2 for 2)
Heat Gun (found in the paint department of most hardware stores)
Masonry Paint
ShopVac for vacuuming up styrofoam pieces

Tip: Do not attempt to rough up styrofoam inside of the house as this process is extremely messy.

I am planning on planting mini gardens in my new troughs.

Step 1: Use Wire brush to rough of styrofoam


Use a wire brush to rough up the surface of the styrofoam. Make sure to work extra hard on the square edges. I found the harder you push on the wire brush, the better the effect will be.

Step 2: Make drainage holes


Use a small drill or something very small to create hole in the bottom of the box for drainage.

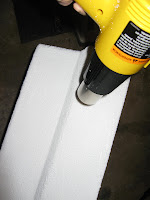
Step 3: Heat Gun


Use a heat gun over the entire exterior surface of the styrofoam box. This will harden the exterior and prevent it from denting.  You can use the heat gun to make imperfections in the surface so it more closely resembles rock or concrete.  I recommend wearing some kind of mask, as the fumes that come off the styrofoam are probably not good for you.

Last Step in Rock trough


The last step in making the "rock" troughs is to paint them with masonry paint to look like rock or concrete. I recommend using more than one color. I only grabbed one today that was supposed to simulate rock, but next time I think I would use at least two colors.

Thursday, April 23, 2009

It's that time of year, spring clean up

In the fall, I am so tired of working in the yard that I dread raking leaves and bringing my plants in for the season.  However, by spring I am so excited to get outside again I can't wait to get outside and rake! Funny how the changing of the season makes such a difference. Even my husband must be touched by the spring clean up bug.  I came home from work yesterday to find him cutting down dead plant stalks and vacuuming the leaves out of my flower beds. Of course, he also loves my new loppers that I picked up at the end of the season last year. He thinks a great toy. It is supposed to be nice for at least the next two days, so I am hoping to finish getting the leaves out of my flower beds and dug and divide some of my hostas that are already coming up.

Saturday, April 11, 2009

"Rock" troughs made out of styrofoam fish boxes

Just happened to catch Wisconsin Gardener on PBS this morning.  A man from Mt Horeb was showing how to make troughs out of styrofoam fish boxes that look like real rock.  Now I have all kinds of ideas for putting mini hostas in them, and putting them at the back of the gardens to add height.  Plus there is a fish/meat market a mile from my house.  I will have to visit them and find out if they will give me some fish boxes.

Here is a link to instructions on how to create these troughs.

Here is the link to the transcripts of the Wisconsin Gardner episode.

Here is a forum where the they are discussing troughs and one of the pictures is one made of styrofoam.


Friday, April 10, 2009

Sure sign of spring


Hosta noses
Originally uploaded by hostageek
Yes, most people would not find this picture very exciting. However I am not most people. You know that spring is finally in the air when you see the first hosta noses start poking out of the ground. Well that day for me was today! I was so excited I had to grab my camera and take a picture of them. This is hosta 'Christmas Tree'.

Sunday, April 5, 2009

Using boxes to create a new flower bed


I have had a great level of success using boxes as a liner for my garden beds.  
  1. First we remove the grass.  You probably don't have to do this step, but my husband likes to, so I let him.
  2. I then cover the entire area of the new bed with cardboard boxes.  The cardboard boxes act as a natural weed barrier, and also help to keep the soil underneath moist.  I then really soak the boxes with water.  This makes them easier to dig into later.
  3. I then add a layer of compost (or mulch) over the cardboard boxes and water again.
  4. Your area is now ready for plants!
You can also this with thick layers of newspaper.  I used to do this, but I have a robin family that has made their home in my yard.  As soon as I covered the newspaper with my compost they would pull the newspaper up looking for worms.  So I switched to cardboard.