Thursday, July 7, 2011

Lily Trees

It's almost time for the sweet smell of lilies in the air.  Just the other day my neighbor came over and asked me if I had heard about Lily Trees.  She said there was an article in the local paper, and someone in our town was selling these new things called Lily Trees.  When she went on to describe the article I realized what she was calling a Lily Tree was really just an Orienpet lily.  They are a combination of an Oriental lily and a Trumpet lily.  They smell wonderful, grow to be very tall (usually 6-7 feet in my garden), and have very thick stalks that usually do not require staking.  I grow mine in both full sun and partial shade, and they don't seem to prefer one over the other.  Lily Tree, as stated in the article, is simply a marketing ploy.  Some plant catalog decided to call them Lily Trees in hopes of boosting their sales, but really they have been around for a while.  I hate it when plant companies come up with these ploys, it is usually the companies you want to stay away from (but that is just my opinion).  Another lily not mentioned in this article that also grows to be very tall are L.A. Lilies or longiflorum-asiatic lilies, which are a combination of an Asiatic and an Easter Lily.  L.A. Lilies usually bloom earlier in the summer then the Orienpet lily.  L.A. lilies do have some fragrance, but they are not quite as strong as an Orienpet lily.  Both are quite easy to grow, and would be a great addition to any garden needing a little height.  If you are looking for a local source for these lilies I suggest either Solaris Farms in Reedsville or Rosehill Gardens in Oneida.
Bulb on an Orienpet Lily
Orienpet 'Garden Treasure' getting ready to bloom

The fence is lined with L.A. Lilies which will bloom very soon. 

Tuesday, July 5, 2011

Arisaema heterophyllum - Dancing Crane Cobra Lily

One of my favorite plants in my garden at this moment is Arisaema heterophyllum, otherwise known as Dancing Crane Cobra Lily.  I thought this plant didn't survive the winter, but then in mid June I noticed it making an appearance.  In two weeks time it grew 3 feet with a very thick stalk.  You may notice that it looks a lot like a giant Jack-in-the-Pulpit, and that's because Arisaema is the main genus of the Jack-in-the-Pulpit family.  I LOVE the giant tongue sticking out of the "pulpit".  It prefers light shade.


Monday, July 4, 2011

Seed GROW Project July Update

Well it's July, and I feel I should be hanging my head in shame over my see GROW project. I had been so busy preparing for the garden walk in June, that everything else was kind of put on the back burner.

Photobucket
The "Summer Splash" marigolds are my best performer of the seeds I received. They look as if they may soon be big to bloom sometime soon. I planted them in a few different areas, but ones in this container were the one that grew the fastest. Of the three seeds, the marigolds were the fastest to germinate and grow for me.

Photobucket
The "Italian Cameo" basil could be doing better. I put it in a container with no drain holes, thinking I would just water it as needed. However I went to Oregon for a week, and left it out on my patio table. During that week it rained every single day (and no rain in Oregon), and so I came home to some soggy basil seedlings. It has since dried out, so I am hoping some of the seedlings will forgive me for almost drowning them.

Photobucket
The "Garden Babies" lettuce has been a thorn in my side.  Not because of the seeds themselves, but because of all the critters in my garden. I tried planting it at least three times, and every time they started to sprout some hungry bunnies would munch them down. So right before I left for Oregon I put them in a container, thinking the rabbits couldn't get to them. I returned from Oregon to find they had germinated and were growing well. I thought I had finally won, that was until the chipmunks decided to dig in the container this week. Luckily they didn't dig up everything, so I am looking forward to some cute little baby lettuce heads by this time next month (unless more critters invade).
Here is my June post for the seed GROW project in case you want to check my progress:)
Happy 4th of July everyone!

I'm growing with the SeedGROW project. Thanks to Renees Garden for the seeds.

Wednesday, June 29, 2011

Installing a dripline/sprinkler system

Yesterday I decided it was about time to install the dripline/sprinkler system that I purchased earlier this spring.  I figured it would take me a few days to install, but it was so easy to install I had it installed in one afternoon.  I am not mechanically inclined, so if I can do this I'm guessing just about anyone can.

Here are the things I needed for my job:

To Connect to the water faucet (this is first step):


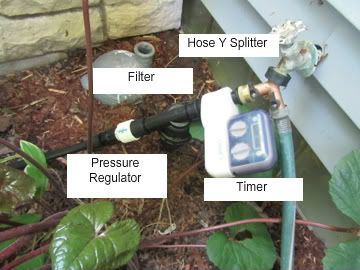
  • 1 Hose Y splitter for my my faucet, so I could have the dripline and still have a hose reel on the same faucet. (optional)
  • 1 Timer (optional) so I can set my dripline sprinkler to automatically water at certain times (daily, weekly, every 2 days, etc).
  • 1 Filter (so dirt and other items do not get into the the mainline
  • 1 Pressure Regulator (I have bad water pressure on my outside water lines)
  • 1 female hose beginning (one connect to regular hose end, other connects to dripline tubing)
To run the dripline and sprinklers:


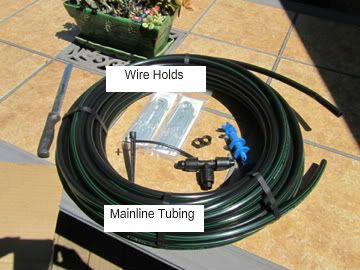
  • 100 ft of mainline 1/2" tubing
  • Figure 8 ends 
  • Easy Loc T's to split the hose (optional)
  • Wire Hold downs to keep hose in place
  • Pocket Punch to punch holes in mainline tubing
  • Sprinklers
  • Something to cut tubing (I used a knife)
  • Shovel (optional - I buried my hose in certain areas).
Steps:
Buried tubing running out to hosta garden
  1. Place mainline tubing in sun for a few minutes, this make it easier to unroll.
  2. Hook up hose y splitter, timer (optional), filter, female hose beginning, and pressure regulator onto faucet.
  3. Unroll mainline tubing
  4. Connect mainline tubing to the female hose beginning.
  5. This is where I buried my tubing underground until it reached the garden, but this is also an optional step.
  6. Run hosing to where you need it and stake down using wire holds.
  7. If you need to run in various directions you will need to split the hose using some easy loc T's like pictured below.
 8. Decide where you would like to place your sprinklers.
 9. Then use the pocket punch to place a hole in the mainline tubing (see below) and insert the sprinklers plugs into the mainline tubing. (repeat until all sprinklers are installed)
Sprinkler inserted into mainline tubing
 10. Use the Figure 8 End to the end of any mainline tubing.  Slide on Figure 8 end about 8 inches, fold tubing in half, and insert other end into Figure 8 End (see below).


It's really that easy!   I found the mainline tubing at my local hardware store, but most of the other parts I purchased from Dripworks.  I highly recommend Dripworks, as they have kits that include everything you need and they are inexpensive.  They also have great video tutorials on their page.