
Here are the things I needed for my job:
To Connect to the water faucet (this is first step):
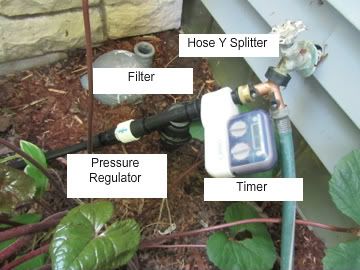
- 1 Hose Y splitter for my my faucet, so I could have the dripline and still have a hose reel on the same faucet. (optional)
- 1 Timer (optional) so I can set my dripline sprinkler to automatically water at certain times (daily, weekly, every 2 days, etc).
- 1 Filter (so dirt and other items do not get into the the mainline
- 1 Pressure Regulator (I have bad water pressure on my outside water lines)
- 1 female hose beginning (one connect to regular hose end, other connects to dripline tubing)

- 100 ft of mainline 1/2" tubing
- Figure 8 ends
- Easy Loc T's to split the hose (optional)
- Wire Hold downs to keep hose in place
- Pocket Punch to punch holes in mainline tubing
- Sprinklers
- Something to cut tubing (I used a knife)
- Shovel (optional - I buried my hose in certain areas).
Steps:
 |
| Buried tubing running out to hosta garden |
- Place mainline tubing in sun for a few minutes, this make it easier to unroll.
- Hook up hose y splitter, timer (optional), filter, female hose beginning, and pressure regulator onto faucet.
- Unroll mainline tubing
- Connect mainline tubing to the female hose beginning.
- This is where I buried my tubing underground until it reached the garden, but this is also an optional step.
- Run hosing to where you need it and stake down using wire holds.
- If you need to run in various directions you will need to split the hose using some easy loc T's like pictured below.

8. Decide where you would like to place your sprinklers.
9. Then use the pocket punch to place a hole in the mainline tubing (see below) and insert the sprinklers plugs into the mainline tubing. (repeat until all sprinklers are installed)

 |
| Sprinkler inserted into mainline tubing |


It's really that easy! I found the mainline tubing at my local hardware store, but most of the other parts I purchased from Dripworks. I highly recommend Dripworks, as they have kits that include everything you need and they are inexpensive. They also have great video tutorials on their page.
4 comments:
What a wonderful project!
Good post . I have been wanting to do this .
Sweet, now you can come install mine!
Jenn, if you pay my way out there I will install it LOL
Post a Comment